
Drywall Contractor of Keller, TX
With the lockdowns starting to lift up more and more people are getting back together. Your family may have stopped by for the holidays, and the kids may have put a hole in the wall. What ever the case may be, you run the risk of having to replace the entire section of drywall. Although this would be costly and inconvenient, it would also leave you with unsightly holes in your walls. It may be tempting to try to repair small holes yourself. However, this is something that should only be attempted if you are certain you can fix the damage in a timely manner.
The third biggest problem with drywall repairs is safety. Drywall can be extremely dangerous to work around. If you are not trained in installing drywall, you can easily become injured by using the wrong tools or techniques. Drywall installation is difficult because of its irregularity. It can easily lead to head or hand injuries if you are not careful.
Easy Solutions
One of the most common reasons people call a drywall repair service is when the wall they have constructed has holes that either look suspicious or are already dangerous. A common scenario is a hole that goes straight into the ceiling. You can expect the cost of this repair to be very affordable. Although these damages do not usually pose a threat to your life or health, they do require time and effort to fix. Without the proper tools or knowledge, your home maintenance technician can cause more harm than good.
Sometimes a drywall repair near me do require the services of a professional contractor. For example, if you have damaged vinyl sheeting that has been ripped off the ceiling, you can use a hot glue gun to patch it up. If the holes go through the sheeting, this is a perfect opportunity to use the hot glue gun as a finishing touch. You should patch up all of the holes the next day and then repeat the entire process for the remaining sections of the sheeting. If you need to patch up a hole in your living room wall, there are a few tools that you will need. One of the most important tools in any drywall repair is a putty knife, as this is the primary tool used to apply the patching tape and keep the new hole in place.
Joint Compound
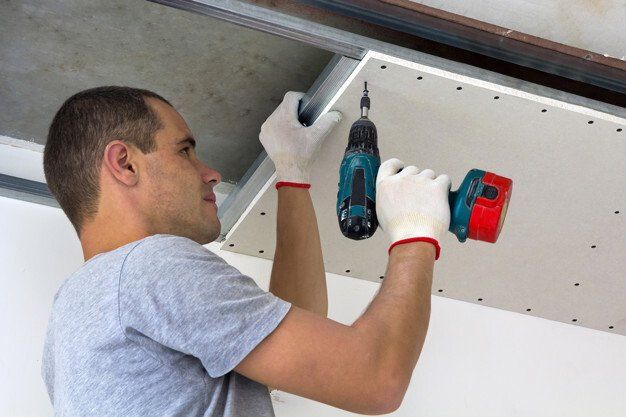
When repairing sheetrock or performing drywall installation we always need to apply the joint compound. This will give the drywall knife a base so that it can cut through the tape easily and move it to the areas that need repair. After the compound is cured, you will be ready to apply the finishing nails and putty to the joints. Covering an older drywall with new drywall installation Keller, Texas isn't always a good idea, a big project, hefty time commitment and a big mess. But in some instances, it is the best way to go. Recently, I had a wall that was falling apart. I called a local drywall company, told them my problem, and they dug around my house for weeks, replacing all the bad drywall with good drywall piece by piece. When they were finished, I could finally breath a little.
By now, I had the drywall popped up in all the right places with no holes or gaps, just like when I got the first set of drywall sheets installed (no pun intended). The company did a great job too, as you can see from the photos I posted about the work. If you're looking for the best drywall repair near me or want to compare drywall repair near me prices, I highly recommend checking out local options. I couldn't wait to move on to other projects and was really excited about the prospect of a new drywall job once the old one was done.
Unfortunately, my drywall nightmare had just begun. When they finished installing the new drywall sheets, I started hearing noises from behind me that sounded suspiciously like joist sliding. Was I having a complete framing error? Was I going to have to start all over again with replacing drywall and joists? The answer was a loud yes. I called a drywall company that specializes in drywall lifts and asked what kind of noise I should be prepared for during the drywall lifting process. The company advised me to be prepared to hear two to four sounds, a click, clack, bang, and groan, plus the sheet rock slippage behind the drywall sheets as the lifting action tries to level the ceiling. It turned out I wasn't prepared for the drywall noise, but it didn't stop me from thanking the contractor for the peace of mind and excitement I got from their safety advice.
Professional Installation
Since the drywall lifting went well, I was ready to move on to the next step - framing the walls. It's always nice to know there's a drywall guy on hand to help us out every step of the way, especially when he has a saw that makes splitting drywall sound like a war fought in attrition. The drywall guy suggested we use stud finders to anchor the joists to the drywall, which I thought would make things easier, but he recommended using dowels instead.
After framing a new room, I was able to move on to finishing the electrical, writing, and design features of the room. As I mentioned earlier, I used drywall jacks to support the joists. They held up nicely, and there was very little noise or vibration while they were being used. When it came time to connect the drywall to the ceiling, however, the drywall jacks had lost their rigidity and were no longer able to hold the joists in place. At that point, I realized I might need to look for residential drywall contractors near me or even cheap drywall contractors near me to get professional assistance. When the drywall lift became weak, I used a tear-away bead to connect the drywall lift and ceiling. I made sure to leave enough headroom so that if the drywall lift were to fall, it wouldn't hit me in the head. The tear-away bead snapped right into place with ease. After I connected the drywall lift and ceiling, I put a chalk line across the top of the drywall to help me mark my work.
I had one last repair to finish before I moved into the newly repaired room. I needed to fix the drywall above the fireplace and that took a little more work than the others. The drywall was hanging off of the ceiling joist and venetian plaster since I didn't want to buy another drywall kit, I cut holes where the ceiling and fireplace met. Then I used some silicone caulk to hold the new gypsum board in place and then repaired the top and bottom of the hole with a popcorn ceiling repair tool. Everything was working well again and I was ready to move into my new home!
In conclusion, the process of framing walls and finishing the room was made smoother with the right tools and guidance from a reliable drywall expert (contact us). From using stud finders and dowels to applying a tear-away bead and repairing with silicone caulk, every step was documented to help others in similar projects. For more detailed insights and step-by-step guides, check out our
related blogs. If you need professional assistance with your drywall projects, don't hesitate to
reach out to us .
Frequently Asked Questions
How do I know if my drywall needs repair?
Signs like cracks, dents, water damage, or holes indicate you need drywall repair. Timely repair prevents further issues and maintains your home’s integrity.
Can I repair drywall myself, or should I hire a professional?
While small repairs may be DIY-friendly, larger drywall repair jobs are best left to a professional drywall contractor to ensure smooth and long-lasting results.
How long does drywall repair take?
Describe the item or answer the question so that site visitors who are interested get more information. You can emphasize this text with bullets, italics or bold, and add links.Can drywall be repaired after water damage?
Yes, but it’s essential to address the source of the moisture first. Our mold remediation services can also prevent mold from forming.
How much does drywall repair cost?
Costs vary depending on the size of the damage. Contact us for a free estimate on your home improvement project.
What Our Customers Think
-
![]()
Jane & Kyle
Button“A friend of mine recommended that I call Keller Drywall Contractors of Keller TX and I must say that working with them has been a very smooth and easy process. I spoke the foreman Tom on the phone, we set an appointment, he came out for the estimate then knocked out the job right after that. Thank you so much guys!"
- Keller, TX
-
![]()
Jordan Banner
Button“I had a huge hole in my ceiling from the previous plumbing contractor that stepped in the wrong place upstairs, Keller Drywall was able to come out pretty quick and fix the ceiling..."
- Westlake , TX
-
![]()
Gordan Brauner
ButtonBeing a construction contractor I always have a lot going on, so when I call Keller Drywall Contractors of Keller, TX for a sub-contracting job I know that they will come out and do exactly what me and the customer needs. There aren't many crews and companies these days that have the skills and precision as yall
- Keller, TX


Free Onsite Estimates
Contact Us
MENU
Proudly Powered by Snapps